The reason for writing this article is I myself struggled to find a definite answer initially as to how to add a sitemap of my blog in Google Webmaster. After constant search I was able to find a solution for adding sitemap of my blog in a simple way. I would like to share my experience with you as I hope this article will be useful for those who are new to blogging (also for existing bloggers) and trying to add a sitemap of their blog in Google Webmaster.
What is a Sitemap?
A Sitemap is a simple XML file that contains specific information about the various pages that you create in your blog. It contains all the information on
- Frequent changes happened in your webpages
The last modified date on your webpage
The importance of webpage in your blog
To put it in a simple way, Sitemap is the collective list of webpages present in your blog.
Why to use a Sitemap in your blog?
Sitemap helps us to make sure that google has all the information related to the pages that we create in our blog. Your webpages will be crawled easily if you submit the sitemaps of your blog to Google Webmaster.
How to add a sitemap of your blog?
Here are the possible simple steps that you have to follow to add your blog’s sitemap to Google Webmaster Tools.
Add your Site to Google Webmaster
1. Sign-in to your blogger Account.
2. Click the Webmaster Tools link Under Tools and Resources present below
3. Go to the option Sitemap
4. Click Add Site and type your blog URL

5. Your Site will be added to Google Webmaster
Verify the Site that you have added
6. To verify the site you need to add a Meta Tag to your blog
7. Copy the Meta Tag code given by Google Webmaster as shown in the screen after you have added your site. Make sure you choose the Meta Tag option in the verification method.
It will look like

8. Now go to Blogger Dashboard - Layout - Edit HTML - then search for the line Head which can be seen few lines below the starting of the HTML script.
9. Then Paste the Meta Tag just below the above code and Save the Template.
10. Now come back to the Google Webmaster Tools and click Verify.
11. Your site will be verified if you followed the above steps correctly.
Add sitemaps of your blog
12. Next step is to add sitemaps of your blog. Select the option Sitemap from the left side
13. You can add the following sitemap of your blogger blog to the Google Webmaster
14. In the text box next to the domain name, enter atom.xml?redirect=false&start-index=1&max-results=500. This will use your atom feed as your Sitemap. The first 500 pages of your blog will be indexed as per this sitemap.
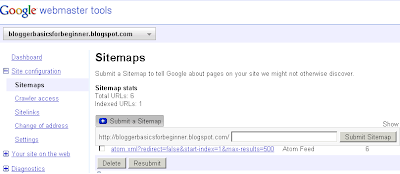
After entering the following values your sitemap will look like this
http://www.yourblogname.com/atom.xml?redirect=false&start-index=1&max-results=500
15. That’s it. Your Blog's sitemap has been added to Google.
After a few hours of time Google will indicate that it had downloaded your Sitemap.
You can view this from your dashboard, or from the Sitemaps section with the Webmaster Tools.
Have a try and let me know if you have any difficulty in doing this.


